

How to Dose Your Portafilter Basket Right
Learn how to match your coffee dose to your basket so you avoid screw dents, protect your machine, and pull sweeter, more consistent shots at home.

Hey , grab your cup. Let's dive in.

Shots that taste right, not just look right
I write about pulling better espresso with the gear you already own: grind, dose, timing, and the fixes that actually work at your counter. Real numbers, not vibes.
Get the next dial-in before you need it.
The ritual of dosing deserves its soundtrack. Press play, and let’s get into it.
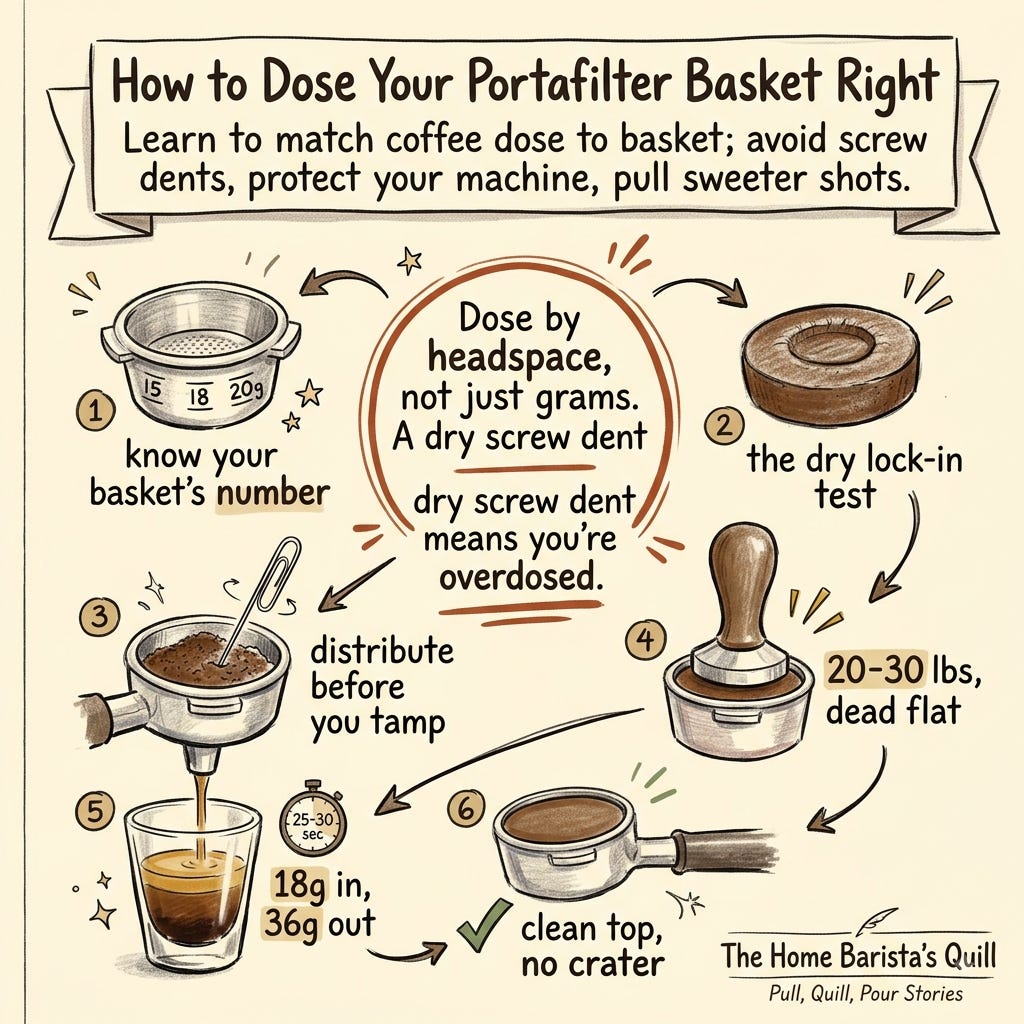
You can pull a “perfect”-looking shot and still be overdosing your basket. The clearest red flag is a clean indentation from the grouphead screw in a dry puck, which tells you the coffee bed is too tall before brewing. Back the dose down, and your machine, your basket, and your taste buds all breathe easier.
Most home baristas chase a fixed number like 18 grams without checking how it actually fits their specific basket. Factory baskets often have an intended gram range and work best when you stay within 1 to 2 grams of that, with a little wiggle room for roast and bean density. When you consistently dose beyond what the basket was built for, you end up forcing the puck into the shower screen and screw. That extra compression sounds powerful but usually just causes channeling and slow, harsh extractions.
But here’s what everyone misses… the goal is not to “fill the basket to the brim”; it is to give the puck just enough headspace so it can swell under pressure without touching metal before water flows. A couple of millimeters of clearance above the tamped bed is typically all you need for even flow and a sweeter cup. Once you see dose as “puck height” instead of just grams, dialing in becomes much more repeatable shot to shot.
Step 1: Match Dose to Basket and Coffee
Start by figuring out what your basket is meant to hold. Many precision baskets are labeled 15, 18, 20, or 22 grams, and they are designed to work best within about ±1 gram of that number. If you run a generic double basket without a marking, a practical range is often around 16 to 18 grams for a classic double, adjusting by taste and fit.
Roast level and bean density change how much “height” you get from the same gram weight. Medium-light coffees tend to be denser and can sit lower in the basket at a given dose, while darker roasts are more fragile and fluffy, reaching the same height with fewer grams. That means the same 18-gram target might fit beautifully with a medium roast but push too hard into the screen with an oily dark blend. If you switch coffees and start seeing screw marks again, your basket is telling you to revisit the dose.
Here is a simple way to frame it in your head as you get to know your basket:
Start at the basket’s printed dose if it has one, or 17 to 18 grams for a standard double if it does not.
Expect to go 1 to 2 grams lower for darker, fluffier roasts to maintain the same puck height.
Keep your shot recipe around a 1:2 ratio to start, for example, 18 grams in and 36 grams out, and adjust the taste later once the fit is solved.
Step 2: Use Headspace as Your Dose “Gauge”
Once you have a starting gram weight, your real dose check becomes headspace, not the number on the scale. Headspace is simply the gap between the top of your tamped puck and the shower screen before brewing. Too little headspace, and the puck rams into the metal, sealing too tight and forcing water to carve channels through weak spots. Too much headspace and the water can spread, fall, and slam into the puck unevenly, which also harms extraction.
You don’t need calipers to judge this, just one quick “dry lock in” routine:
Dose your usual amount into the basket, distribute, and tamp flat.
Lock the portafilter into the grouphead without starting a shot.
Unlock it, remove the basket, and inspect the puck.
If you see a clear, centered indentation from the grouphead screw at this stage, before any water has hit the coffee, there is too much dose for that basket height and grind. Back the dose down by 0.5 to 1 gram, re-tamp, and repeat until the dry puck comes out smooth on top. Once you reach a point where there is no dry screw mark but you still have only a few millimeters of space, you are right in the sweet spot.
You might still see a light screw impression after the shot, and that is often fine. La Marzocco and other manufacturers note that the puck swells under pressure, so a post-brew screw print alone is not a problem if the shot tastes good and the dry puck has clearance. The key rule is simple: a screw dent in a dry puck means overdosed; a screw dent only in a spent, wet puck can be normal.
Step 3: Keep Distribution and Tamping Honest
Once your puck height fits the basket, your next job is to keep the coffee bed even so that water meets uniform resistance across the whole surface. Poor distribution can still give you screw dents and channeling even at a correct dose because loose pockets under the screen collapse unevenly. The fix here is a small, repeatable puck prep ritual you can run on every shot.
After grinding into the basket, gently tap to settle the mound, then use a thin needle WDT tool or even a paperclip to stir from bottom to top and break up clumps. This evens out density and removes weak spots that water would otherwise attack. Level the surface with a simple distributor or your finger, then tamp firmly and straight with about 20 to 30 pounds (9 to 14 kilograms) of pressure.
A self-leveling tamper can help if you find your puck is often thicker on one side. A tool like the Normcore Precision Tamper gives you a flat base and a guided plunge so your tamp lands square on the bed every time without leaning. That consistency protects your carefully chosen headspace, since an angled tamp on an already tight puck makes screen contact more likely on the higher side.
Remember, distribution and tamping do not fix a truly overdosed basket; they only help you get the most from a good dose. If you are still seeing dry screw marks after tightening up puck prep, the answer is almost always to lower the dose slightly until the puck top can sit clear of the hardware.
Step 4: Taste and Puck Clues to Confirm
Once your dose and headspace are under control, your shots should settle into a more predictable pattern. A solid starting recipe is about 18 grams in and 36 grams out in about 25 to 30 seconds for a traditional double. Use this as your tasting baseline. Sour and sharp shots usually need a finer grind or a small dose increase, while bitter, drying shots often call for a coarser grind or a tiny decrease in yield.
After each shot, pay attention to both the cup and the puck:
The espresso should show steady, syrupy flow without spraying from a bottomless portafilter.
The puck should knock out mostly in one piece, with a smooth top, no deep screw crater, and no obvious channels at the edge.
A slight impression from a puck screen or shower screen after brewing is acceptable if taste is on point.
If your coffee tastes good but the puck looks a bit messy or soggy, that is not always a problem. Manufacturers like La Marzocco explicitly note that puck appearance is secondary to taste, since different coffees and ages can change how the cake behaves once spent. The only visual you should treat as a hard stop on dose is that dry screw indentation when you do the lock-in test.
You can also use tools that make repeatability easier. A compact, responsive scale under your cup helps you hit the same brew ratio every time. And if you want shots to feel calmer and more predictable overall, a bottomless portafilter paired with the Normcore WDT Distribution Tool gives you a powerful combo for seeing and fixing channeling before it ruins your morning.
Note: Think of your basket dose as “how tall can this puck be while still leaving a small air gap?” If the screw kisses the dry puck, you have crossed the line, no matter what the scale says.
Status Upgrade: From Guessing to Confident Dosing
Once you build this little headspace habit into your workflow, dosing stops feeling like guessing and starts feeling more like a simple check box. Instead of chasing random gram numbers from recipes online, you are listening to your exact basket, machine, and coffee combination. That alone pushes you into a more confident tier of home barista because you understand why a certain dose works in your setup.
You also reduce wear on your gear. Overfilled baskets can strain group gaskets and warp screens over time, especially if you are cranking the handle to force a tight fit every shot. With a slightly lower, properly spaced puck, the portafilter locks in smoothly, and your extractions run without drama. That is the kind of “boring” espresso routine that quietly delivers joy every morning.
If you want more on puck prep and channeling, you can go deeper in “Fix Uneven Espresso Extraction at Home: Stop Channeling and Master Puck Prep.” For a broader overview of how grind, dose, yield, and time all work together around that puck height, “How to Dial In Coffee for Great Espresso: A Clear Expert Guide” is a solid companion read.
If this kind of step-by-step, quietly obsessive espresso guidance helps at your counter, consider becoming a paid subscriber. Paid readers get deeper how-to breakdowns, advanced experiments with clear data, and steady, practical frameworks that make home shots feel more like café work without needing café gear. That support keeps in-depth, independent coffee writing going for the long term, focused on real home barista problems instead of quick hits.
Curious what your setup looks like: what basket size are you using, and do you see that dry screw mark with your current dose? Share your basket, dose, and shot time in the comments so we can tune it together.
Enjoying this? Subscribe free to get every post straight to your inbox.
Warmly,
Jim
Pull, Quill, Pour Stories
Some links in this post are affiliate links, which means I may earn a commission if you purchase through them at no extra cost to you.