

WDT works. Here's When It Doesn't.
WDT tools improve espresso consistency by reducing channeling. But they're not a fix for everything. Here's when the Weiss Distribution Technique actually helps.


There’s a moment most home baristas know: you’ve just pulled a shot that looked promising, the timer read 28 seconds, the weight was right, and it still tasted thin and sour on one side of the cup. You tamp again. Same result. You start second-guessing your dose, your pressure, and your beans. What you might not have questioned is what the grounds looked like before the water ever touched them.
That’s where the WDT tool espresso conversation usually starts. WDT, or the Weiss Distribution Technique, is the practice of using a fine needle or set of needles to stir the ground coffee in your portafilter basket before tamping. The idea is simple: grounds that clump together create uneven density in the puck, and water takes the path of least resistance straight through the soft spots. That’s channeling. The stir breaks up those clumps and levels the bed.
It works. For many setups, it works noticeably well. But here’s the part most WDT explainers skip over: the technique solves a specific problem, and if your grinder isn’t creating that problem in the first place, you’re stirring out of habit, not necessity.
Why Clumping Happens
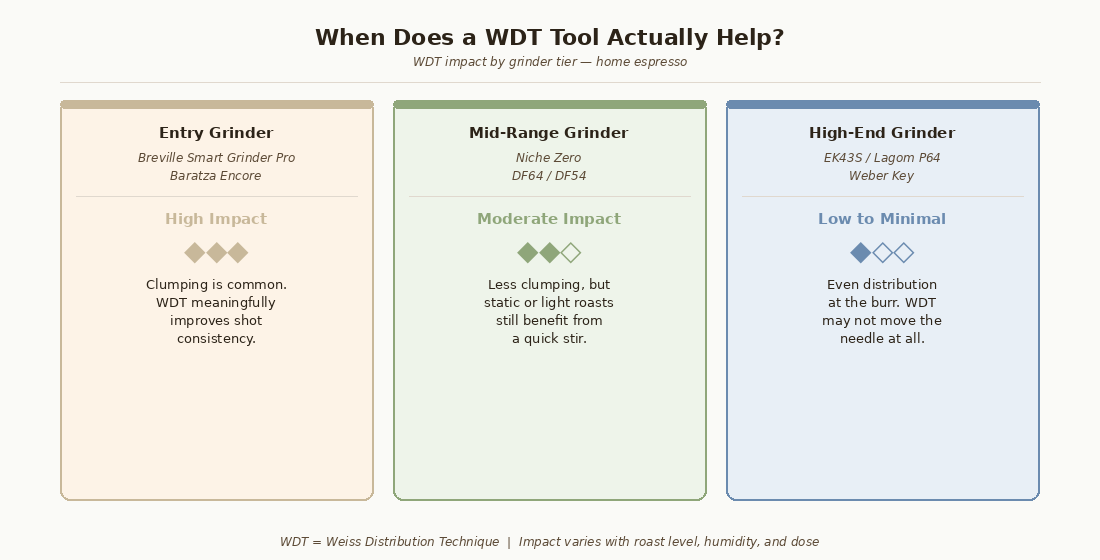
Ground coffee clumps for two reasons: static and fines migration. Grinders that chop rather than shear, particularly single-blade burr grinders at the entry level, produce a wider range of particle sizes. The fine particles are electrostatically charged; they stick together, and by the time your dose lands in the basket, you’ve got a puck with uneven density baked in before tamping.
Static gets worse with certain beans, certain climates, and lighter roasts. Light roasts are denser and produce more fines when ground. So if you’re dialing in a Kenyan natural on a cold, dry morning, you’re looking at maximum clumping conditions. WDT was practically invented for this scenario.
A quick stir with a thin needle, done gently in a circular motion from the outside edge toward the center and back, breaks up those clumps and redistributes the fines more evenly across the bed. The result is a puck that tamped level is actually level. Water flows evenly through it. Your shot stops channeling.
When WDT Stops Moving the Needle
And then there’s the other scenario, the one that doesn’t get talked about as much.
If you’re running a grinder with flat burrs at 64mm or larger, like a Niche Zero or a well-aligned DF64 Gen 2, the distribution happening at the burr is already doing a lot of the WDT’s job. These grinders produce a tighter particle size distribution, generate less static, and tend to drop grounds into the basket with less clumping to begin with. Stir them, and you’re not rearranging much. You’re just adding a step.
At the competition level, this dynamic is even more visible. Jack Simpson, the 2025 World Barista Champion, incorporated WDT into his workflow alongside a vibration plate. But Simpson was working with a setup where multiple variables were being controlled simultaneously and where the technique served a specific role in managing very fine, very even grounds under high scrutiny. What works at a WBC routine isn’t always the thing that fixes your Monday morning shot.
The practical takeaway is that WDT’s value scales inversely with grinder quality, and it also scales with roast level. You’ll see more benefit stirring a light roast at any grinder tier than you will stirring a medium-dark, which is denser, produces fewer fines, and clumps less naturally.
How to Use a WDT Tool Properly
If your grinder is entry to mid-range, or you’re working with light roasts and noticing channeling, here’s a repeatable WDT workflow worth trying.
Step 1: Dose into a clean, dry basket. Grind your dose, 16 g to 18 g (0.6 oz to 0.63 oz), is a common starting range, and let it fall into the portafilter. Don’t tap or shake the portafilter yet.
Step 2: Check the mound. A high mound in the center is normal. It means the grounds piled where they landed. This is what you’re about to even out.
Step 3: Insert the needles just below the surface. You don’t need to dig deep. A depth of roughly 0.5 in (1.3 cm) is enough to reach below the clumped surface layer without compacting the bed.
Step 4: Stir in slow circles, working from the outside edge inward. Two to three passes is plenty. The goal is to break clumps and level the mound, not to agitate the grounds into a fine powder.
Step 5: Finish with a gentle tap. One light tap on the counter settles the bed without creating a new mound. Keep it gentle: a hard tap will just re-pack the center.
Step 6: Tamp level with consistent pressure. With the puck now evenly distributed, your tamp will actually mean something. Aim for about 30 lbs (14 kg) of pressure and a flat, level surface.
Step 7: Pull your shot and note the flow. A well-prepped puck flows from the entire basket face within the first two or three seconds. If you see one side running faster, the distribution wasn’t even. Adjust your stir pattern, not your grind.
Geek Corner
The physics behind WDT is about tortuosity, the length of the path water has to travel through the puck. Clumped grounds create short, straight channels. Evenly distributed grounds create longer, more tortuous paths that force water to contact more coffee surface area. This is why a stirred, level puck extracts more uniformly even if the total extraction yield (measured as TDS) doesn’t constantly change dramatically. You’re improving the geometry of the water’s journey, not just the average.
Choosing a WDT Tool
The good news is that a decent WDT tool costs very little and takes up almost no counter space. The Subminimal Flick is the one I see recommended most consistently in the home barista community right now, and with good reason: the needles are thin enough (around 0.4mm) to break clumps without dragging fines into a new mess, and the magnetic cap makes one-handed use practical. For a simpler, no-frills option, the Barista Space Needle Coffee Stirrer gets the job done with a comfortable handle and replaceable needles, which matters once you’ve inevitably bent one fishing it out of the grinder.
Both tools are easy to use, and neither requires any learning curve. The technique matters more than the tool.
If you’re dealing with static-heavy pucks, it’s also worth checking whether your puck prep routine covers all the bases. The channeling piece I wrote a few weeks ago, Stop the Squirts: How to Fix Espresso Channeling for Smooth, Even Shots, walks through the full picture from dose to tamp, and WDT fits into that system rather than replacing any part of it.
The honest summary is this: if you’re on an entry-level grinder and you’re not using a WDT tool, try it. Pull three shots with it and three without, keep everything else constant, and taste them side by side. Most people notice the difference immediately. If you’re running a well-aligned flat burr grinder and you’ve been religiously stirring every dose, take a few days off from it. You might not miss it.
The best puck prep is the one that addresses the actual problem in front of you.
If posts like this one are useful, consider becoming a paid subscriber. Independent, practical writing for home baristas takes real time to put together, and your support is what keeps it showing up in your inbox without ads, sponsored content, or filler. It means a lot.
When you try WDT on your setup, what’s your grinder, and do you notice a clear difference in shot consistency when you stir versus when you skip it? I’m curious whether the tier pattern holds up across the setups you’re actually using.
If you know someone who’s been chasing channeling and can’t figure out why their shots are inconsistent, this one might be worth passing along.
Warmly,
Jim
Pull, Quill, Pour Stories
Some links in this post are affiliate links, which means I may earn a commission if you purchase through them at no extra cost to you.